Wednesday, April 29, 2020

How to Boil Eggs?


This video will show you how to boil eggs and peel the shell easily. There are many ways to boil the eggs and peel the shell, but I'll show you the simple way to do this. The method I'm using to boil the eggs is very simple and this is a common method in Indian cooking.


Boiling eggs would normally take 6 to 7 minutes and they are healthy and a good source of proteins. Boiled Eggs can be eaten as it is with just salt and pepper, also can be garnished with finely chopped onions, green chilies, and coriander leaves. Boiled Eggs are also used for Biryani recipes, curries, pakodas, and other starter recipes.

Ingredients

  1. Eggs - 6 ( cleaned )
  2. Salt - 1/2 tsp
  3. Water as needed

Directions

  1. Take a bottom saucepan and add water as required.
  2. Place the eggs carefully into the pan and turn on the stove.
  3. Add 1/2 tsp of salt but don't mix it and there is no need to cover them.
  4. Boil these eggs for 7 to 8 minutes on a medium flame.
  5. After 7 to 8 minutes, switch off the flame and leave it for 5 minutes to cool down.
  6. Remove the eggs from the saucepan and put them into a cold water bowl, The water at room temperature can also be used.
  7. Leave them in the cold water until completely cool down.
  8. Take an egg, tap, and roll on the countertop which will break the eggshells.
  9. Peel the shell completely.
  10. That’s it! This is how you cook boiled eggs.
Boiled Eggs can be eaten as it is with just salt and pepper, also can be garnished with finely chopped onions, green chilies, and coriander leaves. Boiled Eggs are also used for Biryani recipes, curries, pakodas, and other starter recipes.

YouTube Video


*********************************************************************
Subscribe to my YouTube channel for new recipes! https://www.youtube.com/channel/UCs28FxRyBwsYgOo0VLJzugQ ********************************************************************* 

Follow me on... 

  • Pinterest - https://in.pinterest.com/myyummyrecipes1/
  • Website - https://myyummyrecipes.in/
  • blogspot - https://myyummyrecipes1981.blogspot.com/
  • LinkedIn - https://www.linkedin.com/posts/my-yummy-recipes-0a41a0175_myyummyrecipes-myyummyrecipes-cookingvideo-activity-6661494461522161664-fvn1
  • Mix - https://mix.com/myyummyrecipes
  • Facebook - https://facebook.com/myyummyrecipes1
  • Twitter - https://twitter.com/MyYummyRecipes
  • Tumblr - https://www.tumblr.com/blog/myyummyrecipesblog
  • Gmail - MyYummyRecipes1@gmail.com
  • Instagram - https://www.instagram.com/myyummyrecipes1/

Tuesday, April 28, 2020

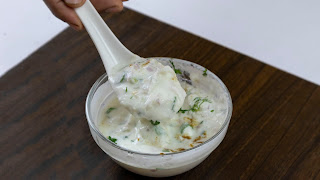
Onion Raita


Onion raita is a side or dip to compliment any food, especially recipes such as palav, biryani, or any rice recipe for that matter. Some people drink just raita. If you add water to raita then it will become buttermilk. 

But the consistency of raita is usually thick, but some people prepare less thick consistency. Raita is made using curd (yogurt), finely chopped onions, few finely chopped green chilies, and coriander leaves. You can also add a few finely chopped carrots and cucumber. 

Raita is very easy to prepare and it will not take more than 15 minutes. There are many variations of raitas but in this video, let's see how to prepare onion raita. 

Ingredients

  1. Fresh Curd - 1/2 cup
  2. Onion - 1 small, finely chopped
  3. Green Chili - 1, chopped
  4. Coriander Leaves - few, finely chopped
  5. Roasted Cumin Powder - a little
  6. Salt - a little bit, as per taste

Preparation

  1. In a bowl, add a finely chopped onion, one finely chopped green chili, few finely chopped coriander leaves.
  2. Give them a mix.
  3. Add 1/2 cup of fresh curd and salt as per taste.
  4. Give it a good mix until the curd gets a smooth texture.
  5. Sprinkle few coriander leaves and a little bit of cumin powder.
  6. That's it! Onion raita is ready.
Serve it with your biryani, palav, paratha, or any rice recipes.


YouTube Video


********************************************************************* Subscribe to my YouTube channel for new recipes! https://www.youtube.com/channel/UCs28FxRyBwsYgOo0VLJzugQ *********************************************************************
Follow me on... Website - httsp://myyummyrecipes.in/ blogspot - https://myyummyrecipes1981.blogspot.com/ LinkedIn - https://www.linkedin.com/pulse/onion-raita-anitha-kiran/?trackingId=GKOjUrgL8DFFgin9z3cqiQ%3D%3D Mix - https://mix.com/myyummyrecipes Facebook - https://facebook.com/myyummyrecipes1 Twitter - https://twitter.com/MyYummyRecipes Tumblr - https://www.tumblr.com/blog/myyummyrecipesblog Pinterest - https://in.pinterest.com/myyummyrecipes1/ Instagram - https://www.instagram.com/myyummyrecipes1/ Gmail - MyYummyRecipes1@gmail.com
Monday, April 27, 2020

Sherva | Shorba | Biryani Gravy


Sherva is a spicy and rich gravy sauce, curry, or soup made with ground nuts, poppy seeds, and spices. Sherva is served as a side to any popular biryani recipe. Sherva is also called shorba which is mixed with biryani rice before eating. Along with sherva, biryani rice can also be mixed with onion raita.

This version of sherva is a vegetarian version but there is also a non-vegetarian version of sherva. Typically sherva is made with fewer veggies such as tomatoes and onions, but you can add more veggies like mushroom, capsicum, and eggplant if any variation is desired. 

Sherva helps in enhance the spice and raita helps to balance the spice of any biryani rice recipe. Sherva and raita are made well ahead in advance and served with biryani rice recipes.

Ingredients

  1. Groundnuts - 2 tbsp
  2. Poppy seeds - 2 tbsp
  3. Cooking oil - 1 tbsp + 2 tbsp
  4. Onion - 1, sliced
  5. Ginger - 1/2 inch
  6. Garlic pods - 5 to 6
  7. Tomato - 1, finely chopped
  8. Mint leaves - few
  9. Coriander leaves - few
  10. Cumin - 1 tsp
  11. Cinnamon stick - 1
  12. Cloves - 2
  13. Cardamom pod - 1
  14. Bay leaf - 1
  15. Green chili - 1, sliced
  16. Turmeric powder - 1/4 tsp
  17. Red chili powder - 1/2 tsp
  18. Coriander powder - 1/2 tsp
  19. Cumin powder - 1/4 tsp
  20. Garam masala powder - 1/4 tsp
  21. Salt as per taste
  22. Water as needed 

Directions

  1. Take a pan and heat it on a low flame.
  2. Add 2 tbsp of groundnuts and dry roast them.
  3. When there is a color change, transfer them into a plate.
  4. Add 2 tbsp of poppy seeds and dry roast them.
  5. When they become little brown in color, transfer them into a small bowl.
  6. Use the same pan, add a tbsp of cooking oil, a sliced onion, 1/2 inch of ginger, 5 to 6 garlic pods.
  7. Sauté them for a minute.
  8. Add a finely chopped tomato and sauté the tomatoes until they become soft.
  9. Add a few mint leaves and few coriander leaves
  10. Sauté them for a minute.
  11. Turn off the flame and allow them to cool for some time. 
  12. Peel off the skin from the roasted groundnuts.
  13. Transfer them into a mixing jar.
  14. Add roasted poppy seeds, sautéed onion, and tomatoes.
  15. Add a little bit of water and blend them into a smooth paste.
  16. Keep the blended paste aside.
  17. Take a pan, add 2 tbsp of cooking oil and heat it on a low flame.
  18. Add a tsp of cumin, a cinnamon stick, 2 cloves, a cardamom pod, a bay leaf, a sliced green chili. 19. Sauté them a little.
  19. Add little water. Otherwise, the spices will burn.
  20. Add 1/4 tsp of turmeric powder, 1/2 tsp of coriander powder, 1/2 tsp of red chili powder, 1/4 tsp of cumin powder, and 1/4 tsp of garam masala powder.
  21. Give them a mix and don’t burn the spices.
  22. Add the blended paste and sauté well until the oil separates.
  23. Add some water to get the required gravy consistency and mix it well.
  24. Add salt as per taste and mix it well.
  25. Close the lid and cook for 5 to 6 minutes on a low flame until the cooking oil floats on top.
  26. Open the lid and give it a nice mix.
  27. Add few chopped coriander leaves and mix it again.
  28. That's it! Biryani sherva is ready.
  29. Transfer it into a serving bowl. 
Sherva is served as a side to any popular biryani recipe. Sherva is also served with parata, roti, pulao, kushka, or any rice recipes and it can be preserved in the refrigerator for a day and can be reheat to serve with biryani rice recipes. 

YouTube Video


*********************************************************************
Subscribe to my YouTube channel for new recipes! https://www.youtube.com/channel/UCs28FxRyBwsYgOo0VLJzugQ ********************************************************************* 
Follow me on...

Website - httsp://myyummyrecipes.in/
Facebook - https://facebook.com/myyummyrecipes1
Twitter - https://twitter.com/MyYummyRecipes
Tumblr - https://www.tumblr.com/blog/myyummyrecipesblog
Pinterest - https://in.pinterest.com/myyummyrecipes1/
Instagram - https://www.instagram.com/myyummyrecipes1/
Gmail - MyYummyRecipes1@gmail.com